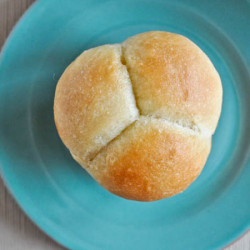
Buttery Cloverleaf Rolls.
Let me tell you about something I excel at.

This something involves food.
Obviously.
I have no other identities.
Unless you count shoes and spending money.
[But it’s not like there’s anything else in life.]

So here it is. I am really, really fabulously great at taking the *best* part of a dish and hogging it all to myself. For instance: muffin tops, crunchy, burned and bubbly cheese on macaroni, the crusty topping on my mom’s signature potato chip casserole, the caramely topping on sweet potato casserole, all of the candied cookie pieces in ice cream, the entire graham cracker crust of a cheesecake, the maraschino cherry in a manhattan (okay… the best part here is debatable), the toasty, butter almonds that come in green beans, and the bacon out of, well… everything.
The second best thing I’m good at is leaving the junky part where I found it. Muffins on the counter? Now they have no top. Mac and cheese in the fridge? No more crunch left for you! Chubby Hubby in the freezer? It’s plain old chocolate now. Manhattan’s during happy hour? Alright… you’ve got me there. The jig is up.

I also put empty containers back in the fridge and throw my wrappers on the table when the garbage can is closer.
I’m
a
brat.

Every time a holiday rolled around, I not only looked forward to stealing the terrific tops off of everyone’s favorite treats, but I reallllly looked forward to these incredibly flakey, buttery cloverleaf rolls that my grandma would get from a local Shop and Save.
How sick is this: the minute I spied the rolls, I would count them, count the number of guests, and figure out how I would be able to stack two or three on my plate without looking like a completely selfish twit. I also said a quick little prayer hoping that most party goers would choose the underrated, firmer poppyseed roll nestled in the corner of the basket. I may have even hyped up the poppyseed rolls. This is no lie. I LOVED THOSE ROLLS!
You could taste the butter with every bite. Plus, I figured I deserved to have more than one because I skipped over all the vegetables. Riddle me that.

I guessed they would be impossible to make. Like… totally mind-blowing and day-consuming. I mean, how do you get yeasted bread to look like a clover?
Well. Guess what? I was wrong. Again. Thank goodness.

Sooooo simple. I’d like to add even more “o’s” to that “so” but I also want you to keep reading and not want to punch me in the face. Last week, I made these with half whole wheat flour and served them as a dunker with sweet potato soup. But I must admit – they are best when made with only all-purpose flour. Just do it! They are a must must must make. Actually, I almost believe they are foolproof? You don’t have to do anything special (except look cute…. which uh, you totally do today!) to make ’em look gorgeous, which is why I showed you that hideous mess on a cutting board that I call the second picture of this post. Make dough, rolls into balls, shove into muffin tins, shove into mouth.
Oh… but not before dousing each roll with melted butter six or seven times. What? You think I’m joking?

Buttery Cloverleaf Rolls
Ingredients
- 4 1/2 teaspoons (2 packets) active dry yeast
- 1/2 cup warm water
- 1 1/2 cups warm milk
- 1/4 cup honey
- 1 tablespoon olive oil
- 1 large egg
- 1/4 cup unsalted butter, softened
- 2 teaspoons salt
- 5 1/2-6 cups all-purpose flour, or more if needed
- melted butter for brushing
Instructions
- In the bowl of your electric mixer (with an attached dough hook), combine warm water, yeast, olive oil and 1 tablespoon honey and mix with a spoon. Let sit until foamy, about 10-15 minutes. Add warm milk, remaining honey, egg and butter, and mix on low speed until just combined, then add in 2 cups of flour and salt. Mix on low speed, gradually increasing to medium as flour becomes incorporated. Slowly add the remaining flour 1 cup at a time, stopping at 5 cups. Knead the dough on medium speed for 4-5 minutes, then check to see if the dough is sticky. If it is too sticky, add a bit more flour and knead until it becomes smooth, but you want some stick to it. Remove dough from the bowl and form into a ball with your hands, covering with a bit more flour until it is no longer sticking to your hands.
- Brush a large bowl with melted butter. Add dough to the bowl, turning once or twice to cover in butter. Place a towel over top and let rise in a warm place for 1 1/2-2 hours. Punch dough down, then transfer to a floured workspace. Tear small pieces of dough off the larger piece, and roll into balls slightly larger than one inch wide. You will end up with about 90 dough balls. Brush a muffin tin with melted butter, then add 3 dough balls to each tin. Cover and let rise again, in a warm spot, for about an hour.
- Preheat oven to 375 degrees. Brush the tops of each clover with a hefty glug of melted butter. Bake for 11-12 minutes, or until tops are just golden brown. Remove from over and brush tops with melted butter again, repeating the brushing another few times as the rolls cool. Remove from the tins and serve.
- The muffins are best when eaten on the same day they were baked, however if you’d like to make them the day before, make sure to let them cool completely and store in an air-tight container.
Notes
Did you make this recipe?
Be sure to follow @howsweeteats on instagram and tag #howsweeteats. You can also post a photo of your recipe to our facebook page.
I appreciate you so much!

They’re so fluffy I’m gonna die!

206 Comments on “Buttery Cloverleaf Rolls.”
Pingback: buttery dinner rolls – a holiday dinner staple | this life we live
Pingback: Clear liquids and homemade dinner rolls « legallybaked
Pingback: Buttery Cloverleaf Rolls {Tutorial} «
I made Pumpkin Bread Pudding (http://allrecipes.com/recipe/pumpkin-bread-pudding-2/detail.aspx) with the leftover stale bread from this recipe… best thing ever. My baby ate it like it was her job. Which is sort of is, I guess. Because she’s certainly not bringing in any income. Leech.
Pingback: » Buttery Cloverleaf Rolls Brownies and Zucchini
Pingback: A Day in the Life of Mosa » In the Kitchen – February Thanksgiving, part 2 but actually sort of part 3.
Pingback: Cloverleaf Rolls for Easter Dinner
Just wanted to say I made these today, and they are quite simply awesome. I halved the recipe which divided into a 12 hole muffin tin perfectly. Will definitely be making these again!
these look absolutely delicious! great pictures, thanks for the recipe! : )
Pingback: Buttery Cloverleaf Rolls | Some Southern Hospitality
Pingback: Thanksgiving Things « Life as Lauren
Pingback: What I Wish I Was Making For Thanksgiving « oh so decadent
Epic failure. I am not a baker and these did not turn out at all. I don’t thnk the yeast (which was new) ever really bloomed enough in the first step. I added a lot more flour (1/2 cup plus) when kneading because they were really sticky? Maybe I should have left them sticky? They were just sort of dense.
so when you are done adding the 5.5 cups, and it comes together as a sticky dough, leave it for 5 mins and then try kneading it for 2-3 minutes, it will come together beautifully…
The best!!
Pingback: Foodie Friday – Thanksgiving Favorites | The Surly Housewife
Pingback: Cloverleaf Rolls | Apollo & Co.
This is my new go to roll. Thanks for the great recipe!
Pingback: Baking for the Holidays | LIVWITHROSES
Pingback: Welcome to The Chew | boys ahoy
Pingback: 50 Recipes for Thanksgiving | How Sweet It Is
Pingback: ‘Everything’ Cloverleaf Rolls
Pingback: ‘Everything’ Cloverleaf Rolls – A Cozy Kitchen
Pingback: Best Thanksgiving Recipes - Thanksgiving Recipe Guide - Kitchenpedia.co
Pingback: Your Ultimate 2019 Thanksgiving Resource Guide: Choose Your Own Adventure! – cookise.info
I don’t know why I’ve never rated these before. I make them every year for my family’s Thanksgiving, and my kids devour them. My husband inhales them. I serve them with some freshly whipped honey butter, and I’m sure all of our arteries are just a little bit more clogged by the end of the meal. But it’s worth it! Fantastic rolls!
I have made these every year since 2012 and I love them! My fave recipe for thanksgiving. Just finished putting them in tins and now I wait for them to rise again.
Can the dough be made a day early (refrigerated) and assembled and baked the next day?