
How To Make Baklava.
I’m about to bombard you with pictures, so let’s just get this out of the way.

Sold yet?
Here’s the deal: I’ve wanted to make baklava for YEARS. As a firm believer of the nuts-stink-in-desserts camp, this flaky treat has always made the cut. In fact, I’m pretty sure that for the first like, 15 years of eating this, I didn’t even know it was nuts. I just thought it was some sort of delicious, caramely heaven thing.
No one in my family ever made it, but a few of my mom’s friends would graciously gift us some around the holidays and I would often hog it all to myself, saving one last piece for my mom. I figured it was impossible to make.
I knew I wanted to put a tiny bit of my own spin on the flavor, so I added cardamom and vanilla beans. Freaky.

I also used mostly pecans, then almonds and pistachios. Pistachios are funny. They are green.
Here’s a bowl of nuts.

Um, let’s talk about how I often do things wrong. Like, everyday. I used salted pistachios. Dude… totally okay. I was nervous, but not nervous enough to go buy a bag of unshelled pistachios and then spend a few hours of my life shelling a pound of them. I’d rather paint my nails. So… I had salted pistachios on hand and I used them. They rocked.
Tyler Florence’s (yes, we are BBF’s now) recipe called for a sh*tton of nuts. I am not even kidding. This recipe would be incredibly affordable if not for the raw, unsalted nuts that cost an arm and a leg. I didn’t read the reviews online before chopping mine up (uh, I mean, why would I do something smart like that?), but you could easily get away with about half of the called-for amount. More on this later.
I also used vanilla beans!

I love spending my life’s savings on food related items.
I chopped everything in my trusty lil’ food processor, including adding the vanilla beans in spurts so they’d be somewhat evenly distributed.

I was afraid that I ended up chopping the nuts too fine, but again… I wasn’t afraid enough to have patience and press pulse 42 times while chopping. Regardless, they ended up being perfect for me.
Oh. Oh oh oh! Something else I did?

I REDUCED THE BUTTER. Yes. I REDUCED THE BUTTER.
I know. Wasn’t sure you heard me the first time. This isn’t necessary, but butter is quite a precious (read: expensive) commodity around here and I figured I’d start with two sticks as opposed to the four that the recipe called for.
Maybe I’ve been abducted by aliens.

Oooooh and another thing? Remember when I made croissants? And before that, how I couldn’t figure out for the life of me why croissants were supposedly soooo unhealthy? Then I rolled a pound of butter into between the dough? Well. This is sort of like that.
There is (almost) a pound of butter in this pan. I freaking love it.
Also like the croissants, I figured that this would be quite a challenge. Turns out it wasn’t very challenging at all, just time consuming. I ended up using my 9×13 Calphalon pan, after Tyler’s recipe (see? BFF’s fo’ life.) suggested refrigerating the layers for 30 minutes before baking. I didn’t need anything shattering in my oven, so this worked great.
First up – you brush the entire bare pan with melted butter. Then, you layer 8 sheets of phyllo dough, each brushed with melted butter, like above and below.

Now would be a good time to talk about the phyllo.
Hmmmm. Me? No patience? Yes. You know this. It would probably be wise to read the instructions first. I opened both packages and hurriedly “unrolled” them to let them thaw. Then I ended up with a giant, flakey mess. Eventually (and four boxes later) I learned to be patience and let them completely thaw, and I did follow the directions by placing a slightly damp towel over top. Even though I did all of that, let me just say that almost every single one of my sheets ended up ripping one way or another in this process, no matter how gentle I was. Moral of the story? Keep going anyway.
Since I had all of those nuts, I knew that two layers (as the recipe suggested) just wasn’t going to suffice. I didn’t want super thick nut layers (that’s what she said?) and I didn’t want to waste the nuts, even though I was already angry because sitting in that food processor up there may as well have been a new pair of shoes. So I did four layers of nuts.

Here’s how it went: 8 sheets of phyllo -> 1 layer of nuts -> 4 sheets of phyllo -> 1 layer of nuts -> 4 sheets of phyllo -> 1 layer of nuts -> 4 sheets of phyllo -> 1 layer of nuts -> 8 sheets of phyllo. With EVERY SINGLE LAYER BRUSHED WITH BUTTER.
Then, as Tyler (my love… darn this relationship is moving fast) suggested, I dumped the remaining butter over top. He’s my kind of guy. I also followed his instructions and threw the whole pan in the fridge for exactly 30 minutes, then brought it out and cut it before baking.

What’s that? You think my slices may look nice?
Uh. Look again.

Not so nice.
But guess what? It didn’t even matter! I baked it for exactly 42 minutes, rotating the pan once in between.
The recipe called for removing a piece (that was awesome. I ate it.), tipping the pan to the side and draining the butter. Uh, come again? I am not ever going to “drain the butter.” But whatever. Luckily, there was no butter to drain, which reinforces my decision to use less than the recipe called for. I ended up with 2 3/4 sticks rather than four. Go me.

While the baklava was baking, I made a honey vanilla bean syrup. Holy smokes. I wanted to drink this.
Just check out those vanilla beans.

The millisecond this comes out of the oven, you dump the syrup all over the top.
Best.thing.ever.

Then you’re supposed to let it “sit for several hours.” Ha! What a freaking joke.
Just do what I did: make it in the late afternoon, then let it sit overnight. However, during the time it is “sitting,” pick off about 17 flakey layers from the top. Works like a charm.

In all seriousness, I did do that, but letting it sit overnight was key. It was so easy to slice and remove from the pan.
Plus… check out those layers.

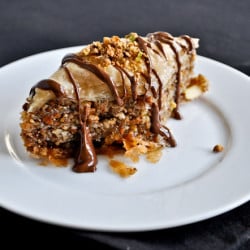
But you know all things are better with chocolate…

Haaaallllp me.

How To Make Baklava
Ingredients
- 16 ounces of unsalted pecans, roasted
- 8 ounces of unsalted almonds, roasted
- 8 ounces of salted pistachios, roasted (if using unsalted, add about 1/4 teaspoon salt to nut mixture)
- 2 whole vanilla beans, scraped
- 1 teaspoon cinnamon
- 1/2 teaspoon ground cardamom
- 1/4 teaspoon ground nutmeg
- 1/4 teaspoon ground cloves
- 2/3 cup brown sugar
- 1 pound of phyllo dough
- 2 3/4 sticks, about 1 1/3 cups or 22 tablespoons(!) of unsalted butter, melted
honey vanilla bean simple syrup
- 1 1/2 cups water
- 1 cup granulated sugar
- 1/2 cup honey
- 1 tablespoons vanilla bean paste
- 2 cinnamon sticks
Instructions
- Thaw phyllo dough according to directions on package, then unroll. Once thawed, cover with a slightly damp towel to keep pliable.
- Combine nuts in a food processor and pulse until finely chopped, adding the contents of the vanilla bean in two or three separate pulses. Once chopped, add nuts to a large bowl and combine with brown sugar, cinnamon, cardamom, nutmeg and cloves, then thoroughly mix.
- Melt butter on the stovetop or in the microwave. Using a pastry brush, brush an entire 9x 13 pan with melted butter. Layer 8 sheets of phyllo dough – each one painted with melted butter – in the baking dish. Be very patient and gentle with the dough, and if it begins to rip, just try to push it into place. After layer 8, spread 1/4 of the nut mixture evenly over the dough. At this point, I wasn’t sure how the next sheet of phyllo would stick to the nuts, so I took my pastry brush and drizzled a bit of butter over the nuts. This helps!
- After the first layer of nuts, layer 4 sheets of phyllo on top – each one brushed with melted butter. Repeat this 3 more times: 1 layer of nuts, 4 sheets of phyllo, 1 layer of nuts, 4 sheets of phyllo, then a fourth layer of nuts. After that layer, add 8 sheets of phyllo on top (instead of just 4) like you did in the beginning, brushing each with melted butter. If there is any butter left, pour it over top. Stick the whole pan in the fridge and refrigerate for 30 minutes. As soon as you stick it in the fridge, preheat the oven.
- Preheat oven to 350 degrees F. Remove baklava from fridge and using a sharp knife, cut as desired. I set my pan down horizontally, then made four cuts from left to right. I then started in a corner and cut diagonals. Once cut, place pan in the oven and bake for 40 minutes. As soon as you place it in the oven, make your syrup below.
- If the top of the baklava gets to brown, tent it with aluminum foil. When finished baking, remove from oven and gently cut out a corner piece. Tilt the pan and if there is any butter laying, drain it. While the baklava is hot, evenly pour the syrup over top. Let set (ideally overnight, covered with aluminum foil once cool) before cutting and serving.
- To make syrup: Combine all ingredients together in a saucepan and bring to a boil. Reduce to a simmer, and let cook for 10 minutes. Remove from heat and let cool completely. Before drizzling, remove cinnamon stick.
Notes
Did you make this recipe?
Be sure to follow @howsweeteats on instagram and tag #howsweeteats. You can also post a photo of your recipe to our facebook page.
I appreciate you so much!

Now all of you get over here now since I seriously HAVE AN ENTIRE PAN OF BAKLAVA ON MY COUNTER!!

253 Comments on “How To Make Baklava.”
Incredible! I made baklava once and also reduced the butter substantially. What are people thinking with 1lb of butter?!
this looks DIVINE!!!! oh my gosh i want some.
every time you have a lot of leftover dessert you should just mail it to a reader. or me..! yum
I was just thinking about trying to make baklava yesterday! Can I come over and help you out with your 4-layered (unheard of!) baklava goodness????? PLEASE!? Pretty, pretty please with gooey butter goodness on top??? :o)
seriously I want to eat that… right now. I’ve been wanting to make baklava forever since it is sold for $4 a pop at the farmers market I go to all summer and I can never bring myself to spend that… YUM
thank god for you. too much? nah.
It’s official: I love you. THANKS!
That, my friend, looks like pure bliss! I ate baklava once. It didn’t taste nearly as delicious as yours looks. I love cardamom. Have you tried Gulab Jamun?? They have cardamom in them & they are phenom! try em soon.
Oh my gawd. Love this! My friend used to make homemade baklava all the time. I sure do miss those days! But now I can make baklava too, thanks to you!
I’m sure someone has already said this, but what about using brown butter? Can’t imagine anything more heavenly than Brown Butter Baklava!
I considered it, but with the baklava being in the oven for 40 minutes, I was actually afraid that the brown butter would burn?? I have no idea, but I didn’t want to waste a pound of butter trying!
I was afraid to even try to make baklava, it sounded so difficult for me but you made it look easy and the final product looks nice!
hahahhaha ohhh goodness me, this looks fantastic! and worth the time spent!
I AM SO MAKING THIS!!! Jess, where do I find vanilla paste? And could I sub?
You should be able to find it at kitchen stores like Williams Sonoma or Sur La Table! If you can’t find it, you can sub vanilla beans or vanilla extract.
I’m actually drooling at all the pictures! Lovely presentation! Also enjoyed The Office reference in the middle of your blog. You ROCK!
Dang!!!….
Vanilla paste is the bomb diggity and so is this baklava.
That looks so good. I love baklava. You should try it with ice cream, if you haven’t. We have a restaurant here that sells them. It’s vanilla ice cream, chopped or broken up baklava and a drizzle or two of chocolate syrup…divine!
It looks like from the picture you used a straight knife blade to cut it. If you start by chilling it for 15-20 min in the fridge, and then take a serrated knife, dip in hot water and dry it quickly, then gently cut with that, the tops sheet will come out much prettier. I bet it tasted amazing!
Jessica, baklava is my favorite, I’m on my way over…
Yum
Good heavens. This looks just freakin’ incredible!! I adore baklava but have never yet made it. And I love your honest blow by blow account of putting this together. Beautiful photos, as usual!
Pingback: An Extra-Sweet Season | This Thing Called Life
Having made Baklava myself before, it sounds as if your step by step process was almost identical to mine, though, following the directions in the recipe I had, it ended up being over-baked and was swimming in a pool of syrup. Yours looks much better. By the way, until today, I had never considered that anything needed to be added to Baklava. Yet you drizzled melted chocolate on yours. You are evil. Tyler F. must punish you for this.
I LOVE baklava!
OMG!!! this is to die for!!! I havent had this in years. I had a girl friend whos husband was from turkey and she use to make this when her mother-in-law came to visit. I am going to have to dig out my recipe and compare to yours. I am soo excited! I will have to make for christmas…what a treat!
Croissants and Baklava are two foods that I’ve always wanted to make. No one in my family ever made either. Mother had a BBF that gave us a several dozen croissants each holdiay season. They were like gold in our family. So, I’m going to make some for Christmas Day with my daughters in-laws. My husband loves baklava…I’m going to made your recipe for his Jan. 14th birthday…I’m the only cake lover in my family..so they are all going to love the change. Now to start saving $$ to buy all the ingredients. Thanks
ah-maze-ing. the end.
Yum, you are amazing!
Oh Jessica, I had to post this with the appropriate link on my blog because I love baklava too.
Waving from Houston.
Jane
I’ve never seen baklava like that before, but it actually looks super delicious! I’ve always made a traditional Greek baklava (my grandmother’s recipe). She rolls it before baking it instead of laying the sheets flat, and it only calls for walnuts. A recipe like this might save you a lot of money on nuts, since walnuts are usually a bit cheaper. Also, it definitely doesn’t call for 4 sticks of butter. I can give you the recipe if you ever want to try a different kind of baklava! You won’t be disappointed. It’s the perfect little Greek grandmother baklava recipe! :)
I am literally drooling! I have made baklava once before but it was several years ago. I love you addition of a chocolate drizzle and your pictures are just stunning. Congratulations on conquering another baking challenge! You are my hero!
Oh good gravy. I’ve always wanted to make baklava, too. This might be the year.
Oh. My. Gawd.
Excuse me while I pick my jaw up off the floor.
I’m all over this sister. I wish I lived closer (like, even in your state) so I could sample the recipe that I’ll be making at Christmas :D
I’m dreaming of this now.
These look insanely delicious. Just stared at those pics for about 5 min straight. I think I’m going to make that when I’m at my parents for Christmas since I’ll have some extra time for baking. Still salivating…
Mmm, what a delicious tutorial. I heart baklava!
1. These look to DIE for!!
2. Cardamom is my favorite backing spice EVER!! For some reason, I only discovered it two years ago, but now I look for any opportunity to add some!
I can’t believe I missed this recipe! I love baklava!
I think it’s so awesome you made this! As someone who witnessed it being made generation to generation, it is truly a labor of love kinda dessert! I personally have never made baklava but I have made other Greek desserts with phyllo and learned a little trick the hard way.. See if you live near an international market. The one by me has different kinds of phyllo (and cheap! Seriously, like $2/box)- you want to look for “country style” or “thick” phyllo. I’d say it’s about the thickness of 2 or 3 layers of phyllo and find it to be much more forgiving (as long as you cover with damp cloth, as you mentioned). Ooohh and if you want to save more butter and it doesn’t give you the heebie jeebies, use butter for the bottom and top layers and everything in between, spray butter Pam! It works like a charm and as long as you pair it with some of the real stuff, you won’t taste the difference.
Awesome blog.. You rock!
Pingback: 30 Minute White Bean + Chicken Soup. | How Sweet It Is
Pingback: Brown-butter Vanilla-bean Baklava | FORTHEYUM
Ever since I saw this post, I have entertained the idea of making Baklava for Christmas. Since re-reading and drooling over these pictures, I am committed now!! I just got back from the store & will be making these sometime soon. Do you know how long these keep for? (Or have they stuck around long enough to find out? ;) ) Thanks for this post and wish me luck!!!
-Channing
Well our version of this just came out of the oven and as directed we poured the syrup all over it…just waiting for it to sit long enough to try…but you know what it looks like? BAKLAVA!
Was wondering about the vanilla paste. If I can’t find it locally, and need to substitute vanilla extract, how much extract do I sub in?
And what is meant by scraping the vanilla beans? Sorry for the newbie questions, but I must make this baklava. I have made a different recipe before, but this one looks enticing.
Yum! I love Baklava…a friend of mine used to make it for dinner parties, but since she has moved away, I have been craving it for months!
Love this, you just made me super hungry. I am totally with you about nuts in dessert that is not where they belong. Except in baklava. I am going to be making this soon. wiping drool away now.
Made these for our family Christmas Eve party! They were a huge hit! :) Thanks for the recipe!
This was ridiculously delicious, there are no words for it! Loved it!!! Best part was that it had a crunch, it was light and not very sweet.
Pingback: Supper Club Dessert: Baklava | Fifthfloorkitchen's Blog
thanks for the recipe! I had made spanokopita for dinner and had half the phyllo dough left over and no freezer room to keep it! I also just happened to have a ton of nuts around leftover from christmas baking and some honey i wanted to move on from, and some vanilla beans. perfetto. I didn’t have any ground cloves, so instead i infused the syrup with the whole ones. I also had a meyer lemon from my mom’s tree, so I grated some and added it to the nut mixture. yummy!
yummy on the spanokopita and baklava,, always wanted to learn how to make both.
I roughly followed your recipe. It was delicious! I love reading your blog. Thanks for the great recipes.
WOW! This looks SIMPLY amazing!! I am going to try to make it because it looks SO delicious and I am dying to taste it!! :)